


CAM software for the Pocket NC machine
How to use DeskProto with the Pocket NC milling machine
The Pocket NC is an intriguing machine It offers five-axis milling in a desktop machine, at a very reasonable price. As DeskProto offers supports for rotation axis machining at a low cost, the combination of a PocketNC machine with the DeskProto CAM software offers a lot of value for little money.
On this page:
1. The PocketNC machine
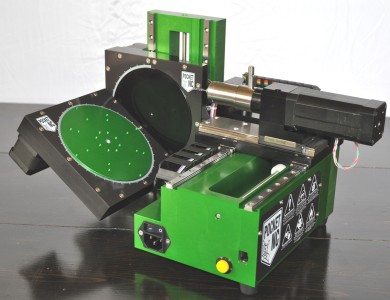

The Pocket NC machine, with a drawing showing the orientation of it's five axes.
The five axes of this cute little machine are not aligned in a usual way:
- the Z-axis is horizontal (normally the Z is vertical with the cutter coming from above).
- the A-axis rotates the complete working table of the machine (normally only the part is rotated).
So with the A-axis rotated to 90 degrees the result is a standard 3-axes machine, "lying on it's side".
And with the A-axis rotated to 0 degrees (as shown in the schematic drawing) it can be seen as a machine with a fourth axis, using Y, Z and B, where a standard machine would use X, Z and A.
DeskProto V7 can easily be adapted to this machine configuration: in the machine definition (Advanced settings) you need to check both
- "Machine with 4th axis parallel to Y (swap X and Y coordinates in the NC file)" and
- "Use B command for this 4th axis (so also swap A and B)".
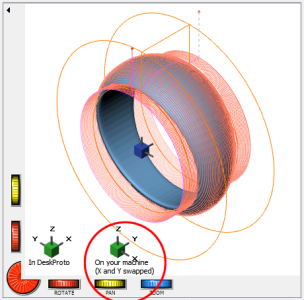
This has already been done in the PocketNC machine definition that comes with DeskProto. As a result an extra orientator will show on the DeskProto screen, as shown in the screenshot below.
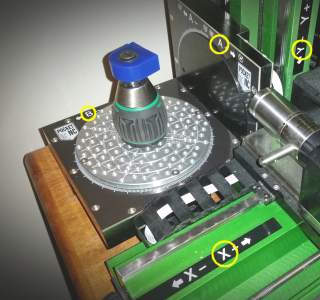
The Pocket NC can be used as four-axis machine for jewelry wax rings.
The image above shows the machine prepared for rotary machining: the A-axis on 0 degrees, the B-axis can keep rotating. A waxblock has been clamped in order to machine a waxring for jewelry production.
DeskProto can very well generate the toolpaths for this machine: the screenshot on the right shows that the axes definitions in DeskProto and on the machine match.
For advanced users:
The situation can even be made more complex by also using the machine's 5th axis:
then you can either use toolpaths for 5-axis "Indexed machining", or use DeskProto's "4th axis tilt option" to keep using continuous rotation while cutting. These workflows will not be covered on this page.
2. The PocketNC controller
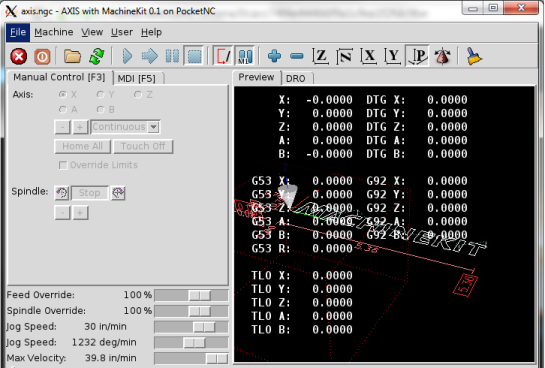
The "AXIS" user interface Pocket NC: the program Machinekit is a special branch of LinuxCNC.
The controller of the Pocket NC also is quite unusual. Almost all desktop CNC machines use control software that runs on a plain PC (Mach3, WinPCNC, EdingCNC, CNCUSB, GRBL, etc), opens an NC file from the PC's hard disk, and then sends commands to the controller of the machine. Such standard controller is not intelligent: the intelligence is in the control software on the PC.
The Pocket NC uses a different system: here a complete Linux PC has been built in, as intelligent controller. This PC is the Beagle Bone Black ("BBB"): a credit card size Linux based PC. Pocket NC added a second board: a custom made daughter board ("cape"), as 5 Axis motor drive and Spindle drive interface.
On this PC you need to log on into Linux, and then start the MachineKit program, which is in fact a special flavor of the open source CNC machine controller LinuxCNC. Pocket NC uses both names on their website. The AXIS program shown in the image above is the User Interface of LinuxCNC.
The BeagleBone can be run by attaching a mouse, a keyboard and a monitor, however, as you will have a standard PC available anyway, PocketNC advises to operate the BeagleBone via this PC, by using the program Putty to start a remote session (run the Linux PC in a window on your Windows PC).
We found that this terminology can be rather confusing when you are not used to building your own computer hardware (it took us some time to understand). We hope that the above overview will help you understand how this machine works.
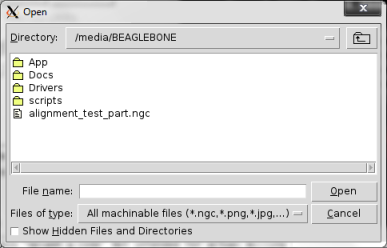
The LinuxCNC File Open dialog to browse a .ngc file on the BeagleBone.
Having a complete Linux PC available as controller makes the Pocket NC a powerful machine. Unfortunately a serious drawback is present as well, as ths built-in PC has limited capabilities:
The NC file needs to be completely transferred to the BeagleBone's memory which is quite small, so the maximum file-size for the NC file is limited to 2.5 MB. Which is quite small for DeskProto.
Here is what the PocketNC website says: "Note that Gcode files must be 2.5 MB or less to transfer. This is also the maximum file size that the processor can handle when it comes time to check the Gcode for errors before running it."
For DeskProto users this filesize needs to be carefully monitored, as NC files easily will become larger. In the DeskProto postprocessor you can tell DeskProto to automatically split the NC file into smaller segments, however we heard that loading a series of programs on the Pocket NC is not really easy.
We also heard that NC files larger than 2.5 MB are possible (up to 20 MB), with extra care: "I discovered that I need to load a large NC file as the very first thing prior to homing the machine. If I want to cut another file on the same part I need to restart the CNC GUI and reload the next file. It's just a limit of the Beagle Bone Black."
3. DeskProto settings for PocketNC
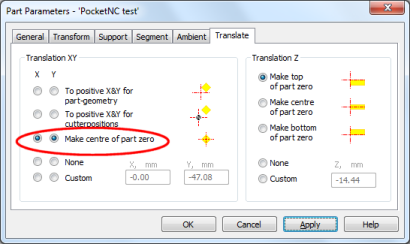
DeskProto translation settings to position X and Y zero in the centre of the block.
While most machines allow to position the WorkPiece zero point on any location, the PocketNC has a fixed location as zero point. Which does of course make sense for this 5-axis machine. It is set automatically when starting up the machine, using a G54 command
It is located at the point where the A axis and B-axis intersect. This point is located 0.88XX inch above the center of the round working table, see the drawing at the top of this page. The 0.88XX" distance from B-Table to the center of A axis rotation is called the “B-table offset”. It is different for each machine and the exact value is specified on a paper that comes with each machine.
The easiest way to use the machine for three-axis machining is to clamp the material in the center of the machine's working table. In DeskProto it is easy to set the zero position in the centre of the part: see the screenshot of the Translation settings above. Only the Z=0 then needs to be set, which will depend on the thickness of your block and on how you clamped it. This will be done using a G55 command in the NC file, telling the machine to use a second coordinate system, at a certain offset from the original G54 system.
Here is the workflow for 3-axis jobs:
- In DeskProto select machine "Pocket NC, XYZ jobs".
- In DeskProto set the X and Y translation on "Make centre of part zero".
- Write the .ngc file and copy it to the machine's control PC.
- Clamp the block centered on the table.
- Rotate the A-axis to 90 degrees and the B-axis to 0 degrees to create a 3-axis machine.
- Open the .ngc file from DeskProto in LinuxCNC.
- Open the MDI-window in LinuxCNC, to manually enter a G-code command
- In the MDI window enter command "G10 L2 P2 Z#" to define the offset for the second coordinate system (P2), to be used by G55.
- Start machining.
An alternative could perhaps be to put the Z=0 at the bottom of the part: in that case the G55 offset would be equal for all block sizes.
For rotation axis machining a different machine definition needs to be selected in DeskProto: "Pocket NC, rotary jobs". This machine definition will swap X and Y and also swap A and B, as explained above.
The PocketNC's default zero point is fine: exactly on the rotation axis. So now the extra steps to define a second coordinate system are not needed. Instead the position of the block along the machine's Y-axis needs to be set, as that is defined by how you clamped the block of material. In DeskProto (before swapping) this is the X-axis, so you can use the X-translation to position the toolpaths on th correct location.
Here is the workflow for rotary jobs:
- In DeskProto select machine "Pocket NC, rotary jobs".
- In DeskProto keep the Y and Z translation on None, and set a custom X translation.
- Write the .ngc file and copy it to the machine's control PC.
- Clamp the block centered on the table.
- Rotate the A-axis to 0 degrees, which will make the B-axis vertical.
- Open the .ngc file from DeskProto in LinuxCNC.
- Start machining.
A complicated process description, sorry about that. Nevertheless it works, and allows you to create fabulous parts on this powerful machine !